Guidelines for Progressive Relaxation
To complement the Tip of the Month, we present two types of relaxation techniques for stress relief and training recovery.
Guidelines For Progressive Relaxation
Instructions
Learn to identify tension in any particular muscle and find ways to alleviate it over time
Only tense specific muscles or muscle groups – hold for a set count (5-7 seconds)
Alternate tensing and relaxing of that muscle or muscle group
After tensing, the muscle or muscle group becomes more relaxed
It is a two-step process: the cycle of tension and relaxation for each set of opposing muscles
Concentrate on the ‘feel of the muscles’, specifically, the contrast between tension and relaxation
Perform the entire sequence once per day until you can control muscle tension (at home) in addition to a training session
Problems with pulled muscles, broken bones, or any medical issues need medical attention
Avoid contraindicated exercises
Reference:
Schloder, M. E. (2017). Physical literacy for children and youth through FUN, fitness and fundamentals, pp. 275-282
Breathing
Take a deep breath as deep as possible, take some more, then exhale slowly
Normal breathing for 15 seconds/exhale more deeply from the lungs, forcing the remaining air out
Breathing is slow and evenly – think about tension-relaxation contrast
Use recommended count until having a ‘feel for the period’ such as … “Breath in 1, 2, 3, 4 – Breath out 1, 2, 3, 4” or use an 8-count
Avoid holding your breath, gritting your teeth, or squinting the eyes
Sequence
Use an 8-count to hold each tension – slowly breathe out, release, and relax 8-count
Progressive relaxation is a technique whereby each body part undergoes tension and relaxation from the forehead down to the toes in a progressive sequence.
Begin with the forehead, advance to eyes, cheeks, lips, neck, etc., down the body until reaching the toes by tensing and relaxing each part separately, adding the next part, then combine these for tension and relaxation, add 3rd part, tense and relax, combine #1, 2, 3 for tension and relaxation. In other words, add the new body part while moving downward and then combine it with all previous parts to form a progressive chain
Tense the body part – hold-relax, exhaling slowly – proceed to next body part tense – hold-relax – tense 1st body part – hold-relax – add 2nd body part – tense – hold-relax – proceed to 3rd body part… continue the pattern
Relaxation Protocol
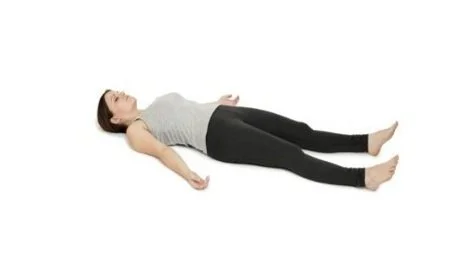
Assume the supine position on the floor on a soft surface (mat/blanket/towel)
The body is extended/arms are at the sides of the body on the floor/the head is relaxed/the eyes are closed
Forehead- wrinkle the forehead/hold-relax
Eyes- open the eyes as wide as possible (furrow row)/hold-relax/close the eyes tightly (squint) – hold-relax (make sure to relax the eyes completely/forehead, nose after each tensing)
Cheeks- crunch, crumble up, squeeze together/hold-relax
Mouth- bring the lips together or purse as tightly as possible/hold-relax
Tongue (extended and retracted)- with the mouth open, extend the tongue as far as possible/hold-relax (let tongue sit in the bottom of mouth/hold-relax/roll it back in the throat as far as possible/hold-relax
Tongue (roof and floor of mouth)- dig the tongue into the roof of the mouth/hold-relax/dig into the bottom of mouth/hold-relax
Neck (lateral)- the shoulders are straight and relaxed/turn the head slowly to the R-side as far as possible/hold-relax/turn to the center/hold-relax/turn to the L-side/hold-relax
Neck (forward)- dig the chin into the chest/hold-relax (dropping chin is not recommended
Hands- tense into fists/hold-relax/extend the fingers/hold-relax
Biceps- tense the biceps (make a muscle), shaking the hands to make sure that they are not tensing into fists/hold-relax
Triceps- tense them (try to bend arms incorrect way/hold-relax (drop them)
Shoulders- pull the shoulders back (carefully)/hold-relax/push the shoulders forward (hunch)/hold-relax
Pull the shoulders up to the ears/hold-relax/push them down/hold-relax
Stomach- pull in the stomach as strong and deep as possible/tense/hold- relax/push the stomach outward/hold-relax
Back- push the body backward and arch/hold-relax/curl forward/hold-relax
Buttocks- tense the buttocks tightly and raise the pelvis off the floor/hold-relax/drop the buttocks to the floor and dig into the floor/hold-relax
Thighs- extend the legs and raise off the floor about 6 inches (stomach should not be tensing/hold-relax/dig the feet into the floor/hold-relax
Calves and Feet – tense the calves – point the toes strongly without raising the legs/hold-relax/lower the legs/hold-relax/point the feet up as far as possible (flex – be aware of potential cramps/hold-relax – if feeling them coming on, shake feet loosely/relax
Toes- with relaxed legs, dig the toes into the floor/hold-relax/wiggle the toes/flex the toes as far upward as possible/hold-relax/point the toes as strongly as possible/hold-relax/wiggle the toes
*Note:
This series can be performed once from head to toe or as a repetitive sequence: tense-relax forehead (1), add eyes (2), repeat 1 and 2, add tongue (3), repeat 1, 2, 3, and continue through the toes; then relax for a short while.
As days of practice progress, skip those steps that do not appear to be a problem of tension
After becoming more aware of personal tension areas (after a few weeks), work only with affected body parts
This exercise does not eliminate tension, but when tension occurs, one becomes aware immediately and can ‘tense and relax’ it away.
Reference:
Schloder, M. E. (2017). Physical literacy for children and youth through FUN, fitness and fundamentals, pp. 275-282.
Foam Rolling
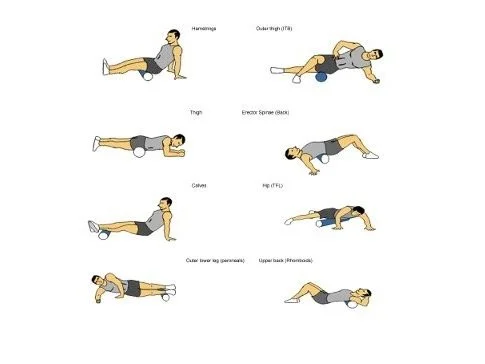
*Note: Foam Rolling (FR) may also be an effective recovery tool, providing hypotensive effects for 10 to 30 minutes. Swimming Science Dr. John Mullen cites research into foam rollers, roller massagers, and similar devices, which generally reported increased range of motion (ROM), diminished perceived pain, accelerated recovery from exercise-induced muscle damage, and enhanced performance (October 25, 2018). The key findings in this review suggest that to achieve optimal ROM, the prescription should involve 1–3 sets of 2–4-second repetition duration (the time for a single roll in one direction over the length of a body part) with a total rolling duration of 30–120 seconds per set.
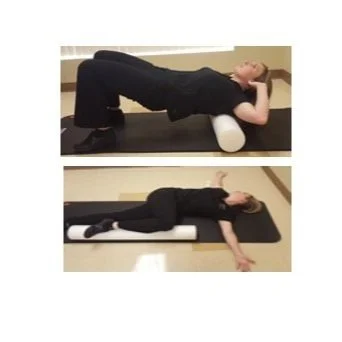
Examples:
Foam Rolling:
References:
Consider G. John Mullen (2018). “Mobility for Swimmers” for more information on foam rolling. https://www.swimmingscience.net/product/mobility-for swimmers/
Lastova, K., Nordvall, M., Walters-Edward, M., Allnutt, A., andWong, A. (2018). Cardiac autonomic and blood pressure responses to an acute foam rolling session. J Strenght Con Res., 32(10), 2825-2830. October. National Library of Medicine (NIH). National Center for Biotechnology Information. PubMed. doi: 10.1519/ JSC.0000000000002562.
Mullen, G.John.(2018). Foam roll reduces blood pressure after exercise. Swimming Science. Blog, October 25. https://www.swimmingscience.net/foam-roll-reduces-blood-pressure-after-exercise/